

If you have long hair, you may get bored of simple straight-down-your-back hairstyles.
As much as we all love a down-to-there mane IRL, sometimes a little
styling is necessary to keep your look from getting too boring and your
strands from getting tangled. On those occasions, instead of reaching
for a hair tie and knotting your hair into a messy bun or plain ponytail,
consider swooping your length to the side for a seriously eye-catching
style that slays. Not sure how to rock side-swept hairstyles? As always,
we got you. Below, we share three of our favorite side-swept
hairstyles—as well as how to create them. So, what are you waiting for?
Grab a brush and get to work!
[post_ads_2]
#1: Side Stacked Braid
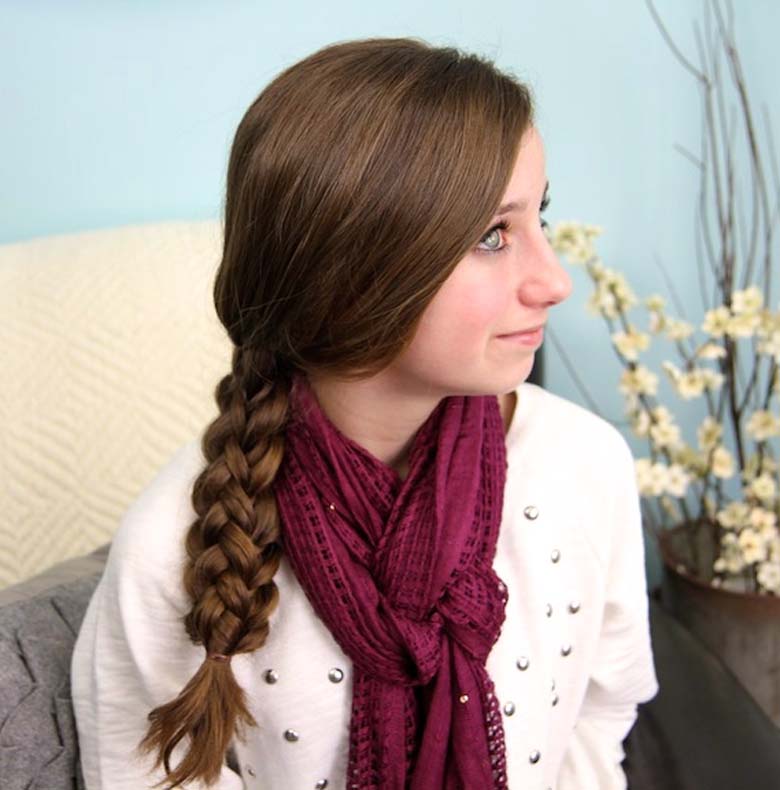
Side braids offer the best of both
worlds in the ways they allow you to show off your enviable length while
getting it all off your neck for a cooler-feeling (and looking) ‘do.
When you pair that with a detailed stacked technique, the end look is
even more stunning—especially when cascading over your shoulder.
What you’ll need:
- Brush
- Clear elastics
- Bobby pins
- L’Oréal Paris Elnett Satin Hairspray Strong Hold
Get the look by following these simple steps:
Step 1:
Detangle your hair.
Gently comb out any tangles in your hair because there’s nothing like
nearly finishing a braid only for it to all unravel due to a knot.
Step 2:
Pull all of your hair around to one side of your head. Pretty self-explanatory, right?
Step 3:
Clip a small section of hair off to the side. Pull about a quarter of your hair out from the underside of your full mane.
Step 4:
Start with the larger section of hair.
Fishtail this section all the way to the ends. Tie it off with a clear
elastic before fluffing it up to add volume to your look.
Step 5:
Braid the smaller section of hair. You can choose to weave a traditional three-strand braid or another fishtail.
Step 6:
Pin the smaller braid on top of the fishtail braid. Wind the smaller braid up over the bigger braid and lay it flat along the top of it, tying both together at the ends.
Step 7:
Pin your braids together. Pop
a few bobby pins through the underside of the braids to pin them
together and your pretty pony is complete! Just give it a final spritz
of hair spray and you’re ready to slay the day.
[post_ads_2]
#2: Glam Volume
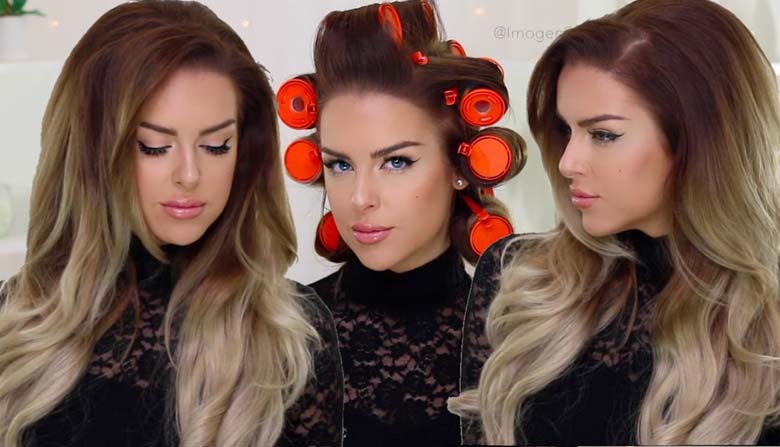
Ever wonder how the movie stars and
models rock such serious volume that looks so casually flipped across
one shoulder for extra camera appeal? Believe it or not, you can rock
the red carpet-worthy look, too.
What you’ll need:
- L’Oréal Paris EverPure Volume Shampoo
- L’Oréal Paris EverPure Volume Conditioner
- L’Oréal Paris Advanced Hairstyle BOOST IT Volume Inject Mousse
- L’Oréal Paris Advanced Hairstyle BOOST IT High Lift Creation Spray
- Blow-dryer
- Round boar bristle brush
- 1-inch curling iron
- Fine tooth comb
Get the look by following these simple steps:
Step 1:
Start with freshly washed hair. Starting
with your hair care is one of the best ways to ensure you achieve the
volume you want. To get the look, lather your locks with a volumizing shampoo and conditioner. Hop out of the shower and towel-dry your hair, making sure to squeeze, not rub, excess water.
Step 2:
Give your lift an assist. Once your hair has dried about 85-90 percent, pump it full of hair mousse. After evenly distributing the hair mousse into your hair, massage your fingers through your roots to help promote lift.
Step 3:
Blow-dry your hair.
Using your boar bristle brush, completely dry your hair, the same way
you would when creating a DIY blowout. Once your hair is dry, create a
deep side part.
Step 4:
Curl your hair.
Heat your curling iron to the lowest possible setting that will
successfully curl your hair, and begin wrapping your hair back around
the barrel, making sure to curl it away from your face. Spray your curls
with hair spray to help set them.
Step 5:
Gently comb out your curls. After you’ve let your curls set, gently run a fine tooth comb through them to loosen things up for a more Hollywood glam look.
Step 6:
Add volume at the root.
Divide your top section of hair out of the way, exposing the strands at
the lining from your hairline back to your crown. Use your fine tooth
comb to gently tease this area of hair from just behind your hairline
back to the crown of your head on the deeper section of your part.
Step 7:
Smooth your top layer of hair.
After you’ve teased for enough volume, smooth the top layer of hair
that you sectioned off back over your hair. Gently run your boar bristle
brush over the top of your head to smooth the outer surface without
disrupting the volume underneath.
Step 8:
Swoop and spray.
Simply pull all your hair over the shoulder corresponding with the
deeper side of your part and give your glam look a final spritz of hair
spray for long-lasting elegance that’s sure to get a like or two on
social media.
[post_ads_2]
#3: Double Twist Fishtail
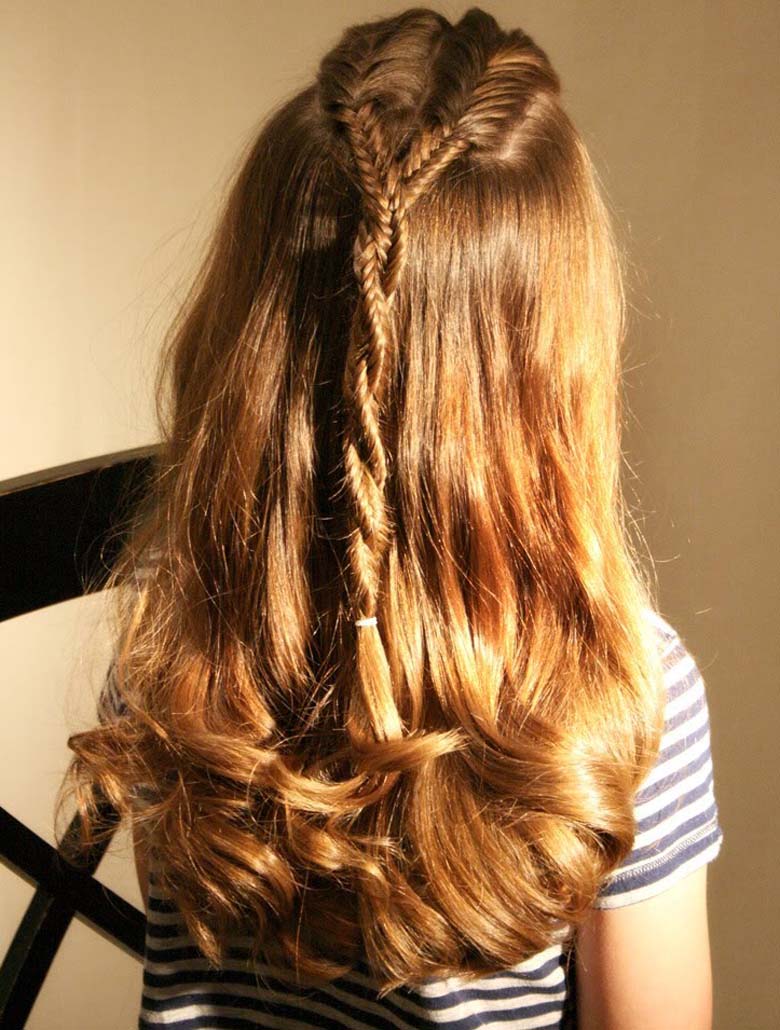
If you love letting your long hair flow
in all its glory but want to keep it a tad contained and tangle-free,
you’re about to fall for this half-up double-fishtail hairstyle. The
best part is, it’s super-simple!
What you’ll need:
- Comb
- L’Oréal Paris Advanced Hairstyle AIR DRY IT Wave Swept Spray
- Bobby pins
- Mini clear elastics
Get the look by following these simple steps:
Step 1:
Comb your hair. There’s
nothing worse than trying to create a cute hairstyle than to come in
contact with a few knots that will make you have to start all over. So,
take the time to detangle your tresses and move on to the next step once
your comb glides easily through your hair. As much as you might love
how soft and smooth your hair feels now, give it a few spritzes of
wave-enhancing spray to create a little extra carefree texture to go
along with the boho vibe of your braid.
Step 2:
Create your first twist. Grab
a small section of hair from each side of your head and twist it back
toward your crown. Unlike some other twisted hairstyles, you won’t
incorporate new hair as you twist along. Just twist the section you have
from roots to ends. Pin each section in place until you’ve completed
your second round of twists, at which point you can secure all four
twists at the back of your head with a clear mini elastic.
Step 3:
Repeat Step 2. This is a double twist fishtail, after all.
Step 4:
Fishtail the ends of your twists. Using only the ends from your two sets of twists, fishtail all the way to the ends and secure it with a clear mini elastic.
Step 5:
Fluff up your braid and twists. To
make your pretty hairstyle look especially whimsical, gently tug at
your fishtail braid to add a little extra volume in each stitch. Then
move on to your twists and gently tug those, too. Voila!
More From L’Oréal Paris


