![[feature] How to Look Picture-Perfect in Every Photo (8 Easy Steps)](https://blogger.googleusercontent.com/img/b/R29vZ2xl/AVvXsEg4yOWlImMQX9pY8wDuRDNf1xfyHz__D6jKIMxvwxcyKM-3Cca46PMLmlG90MScWFvjZdafQSFDCoagmLJRAtgLlfGmePcMEVR_EzjIoFymPa10Z1g0xMYPVefM8sGiKkx3k7_KCOOnx7hC/s1600/tech.dearjulius.com.jpg)
By Victoria R., City Beauty
Has this ever happened to you?
You’re at a beautiful event — happy, smiling, enjoying your company… when all of a sudden… FLASH!
Someone takes a picture of you with half a crab cake hanging out of your mouth…
And they don’t even let you see the picture before they’ve posted it for everyone to see!
(Thanks to Facebook memories, that photo still haunts me every year.)
Don’t get me wrong, I love taking pictures with my friends and family. And I think camera phones are great… sometimes.
But with four weddings lined up in my summer calendar…
I know I need to prepare for the inevitable storms… “photo storms.”
Everyone wants to look good in photos — after all, they keep our most treasured memories for years to come.
Sometimes, however, those sneaky photographers or camera-happy friends pop out of nowhere, snapping an unflattering picture before you’ve even figured out your best angle!
So, to gear up for the storm, I asked a celebrity stylist for some photo-ready tips straight from the red carpet.
And I knew you would love these tips for your summer events, too! So, I made sure to jot down some notes and share them with you today…
Step 1: Find your “spotlight”

Optimal natural lighting happens at a time called “golden hour,” when the sun is low in the sky — shortly after sunrise and right before sunset.
The diffused, reddish glow of “golden hour” helps soften the appearance of wrinkles and imperfections while adding warm radiance to your skin.
Of course, you can’t control the sun… but you can control how you position yourself in front of a light source.
Whether you’re outside by a lampstand or sitting inside near a bright window, remember these simple do’s and don’ts…
DO: Light yourself from the front for a “soft-focus” skin effect.
DON’T: Light from the side. This angle casts shadows which accentuate wrinkles and uneven skin texture.
DO: Keep the light source at eye-level to prevent under-eye shadows.
DON’T: Light from below. These dark shadows are strictly reserved for telling scary stories around the campfire.
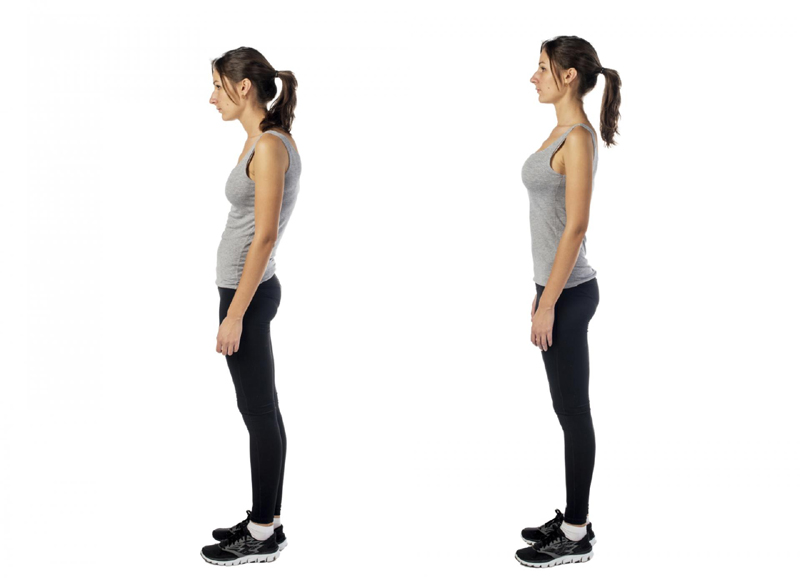
Step 2: Adjust your posture

Why? Elongating your body promotes good posture which instantly helps you appear slimmer — smoothing-out any “folds” in your skin.
Good posture also helps you look lively, confident, and youthful.
In fact, studies show that people with open, expansive postures are seen as more attractive!1
So, try to look relaxed and natural: straighten up, but don’t stiffen up. And remember to keep your neck elongated, as if a string were pulling your head upward.
EASY TIP: The Three S’s…
1. Stand Tall
2. Shoulders Back
3. Stomach In
And hold onto that invisible string because it’ll help you out with the next step…
Step 3: Point your chin down

Does your jawline appear defined? Or are you experiencing the “double-chin effect”?
If you are, no worries! You’re not alone. In fact, many people actually pull their chin inward instead of pointing it out and down.
Luckily, it’s an easy fix…
Again, keep your neck elongated. Then, push your head out and angle your chin just slightly lower. Imagine leaning in to hear a whispered secret.
Take a look at this side-view demonstration as a visual guide:
This will help conceal excess skin under your chin, sharpen your jawline, and slim your face shape overall… especially when you combine it with the next step.
Step 4: The Three-Quarter View

Give the illusion of a lithe frame by angling your “good side” toward the camera.
Simply turn to show only three-quarters of your face and body. One ear should be out of view from the camera and one shoulder should be slightly closer to the camera. Remember to keep your eyes on the lens!
If you don’t know which side of your face is your “good side,” try this easy comparison technique:
1. Cover the left half of your face with paper.
2. Take a photo of the visible half of your face at eye-level (not from above or below).
3. Repeat steps 1-2 for the other half of your face.
4. Compare the photos to see which half has more upturned features: lifted eyes, lip corners, and cheeks. That’s your “good side.”
If you still can’t decide, researchers suggest your left side may be your better half!2
Studies show the left side of your face is more attractive because it appears to express deeper emotion.
Step 5: Move your arms away from your body

Putting a little space between your arms and body helps diminish the look of extra “bulk.”
Now, you don’t have to choose “hands-on-hips” every time… just remember to add a small gap between your arms and body.
Step 6: Shoot at eye-level or higher

The downward angle makes your eyes appear bigger and helps diminish the look of under–eye bags for youthful, wide-awake eyes. Plus, it’ll hide any extra skin beneath your chin.
Kindly ask your photographer to take the photo from above, get lower by sitting in a chair… or gently nudge your friend’s “selfie arm” a tad bit higher.
Step 7: Put one foot forward and point your toes

That’s because adding any bit of height — from your outfit choice to your posture — will help you look slimmer.
With this pose, you can add more length to your legs.
Simply, point your toes (imagine wearing invisible heels) and put one foot in front of the other as if you’re taking a step forward.
Step 8: Smile!

A genuine, happy smile is the “secret sauce” to a beautiful photograph and a beautiful face.
To make your smile appear relaxed, press your tongue to the roof of your mouth, behind your upper teeth. This motion also helps “chisel out” your jawline — tightening the skin under your chin for a slimmer, more youthful look.
My favorite smile tip? Try thinking of something funny to get yourself laughing and loosened up. It’ll help your smile look more natural and spirited.
But if you’re surrounded by loved ones — squeezed together tightly to fit in the picture — I’m sure you’ll have no problem coming up with happy thoughts.
I hope the next time you’re face to face with a camera lens, these tips help you feel 100% photo-ready.
And when you strike your pose and flash your lovely smile…
I hope you feel like the confident, beautiful woman I know you are.
P.S. What’s your “photo storm forecast” this season? Do you have any big photo-ops at your next family, community, or business event?
Did you learn any new tips from this post or have you always been naturally photogenic?
Which tip are you most excited to try the next time you get pulled in for a photo?
Please comment below and let me know!
And please remember to share this post with your friends, so you can all look picture-perfect for your next group photo!
More From City Beauty:


